• BLOG
  • ABOUT
    • Privacy Policy

Organize Your Family History

Stay focused and happy while exploring your roots

The fun of mapping your ancestors

November 19, 2021 By Janine Adams 9 Comments

Today I decided to focus on my ancestor map, the wall-mounted map of the U.S. on which I’ve placed pins indicating the birth and death places of four generations of my ancestors (from my parents to great great grandparents). I started it back in 2013, but it had been awhile since I did anything with the map (beyond enjoying looking at it).

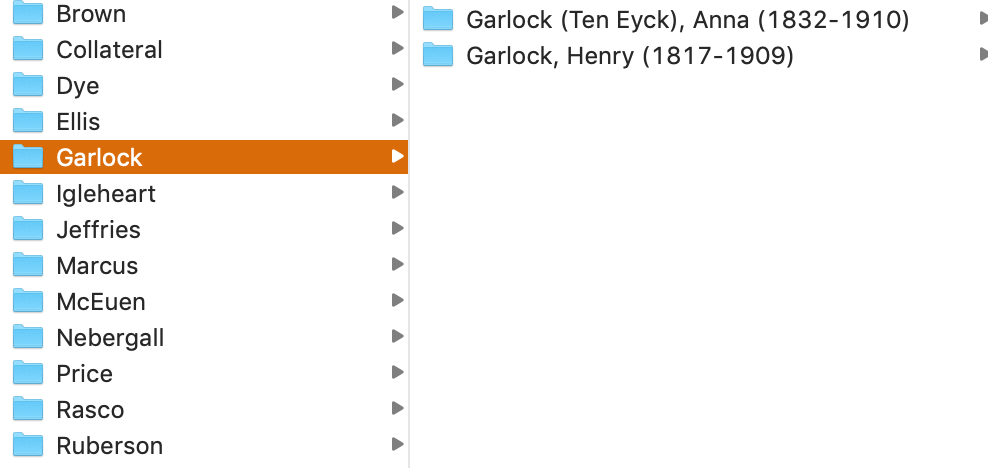
Today I opened the little spreadsheet where I had checked off the ancestors (direct-line only) I had already pinned. Going through it, I identified six pins I could add because I’d found more information (yay!) and four specific birth or death places I need to identify. I created and pinned those six and made a check list of the blanks I need to fill in. Once I find that info and complete this generation (or decide I don’t want to wait), I’ll start adding the next generation.

I think the genealogy map is so fun and valuable, I wanted re-run the post I wrote about it in 2017. I hope it inspires you to perhaps give it a try!

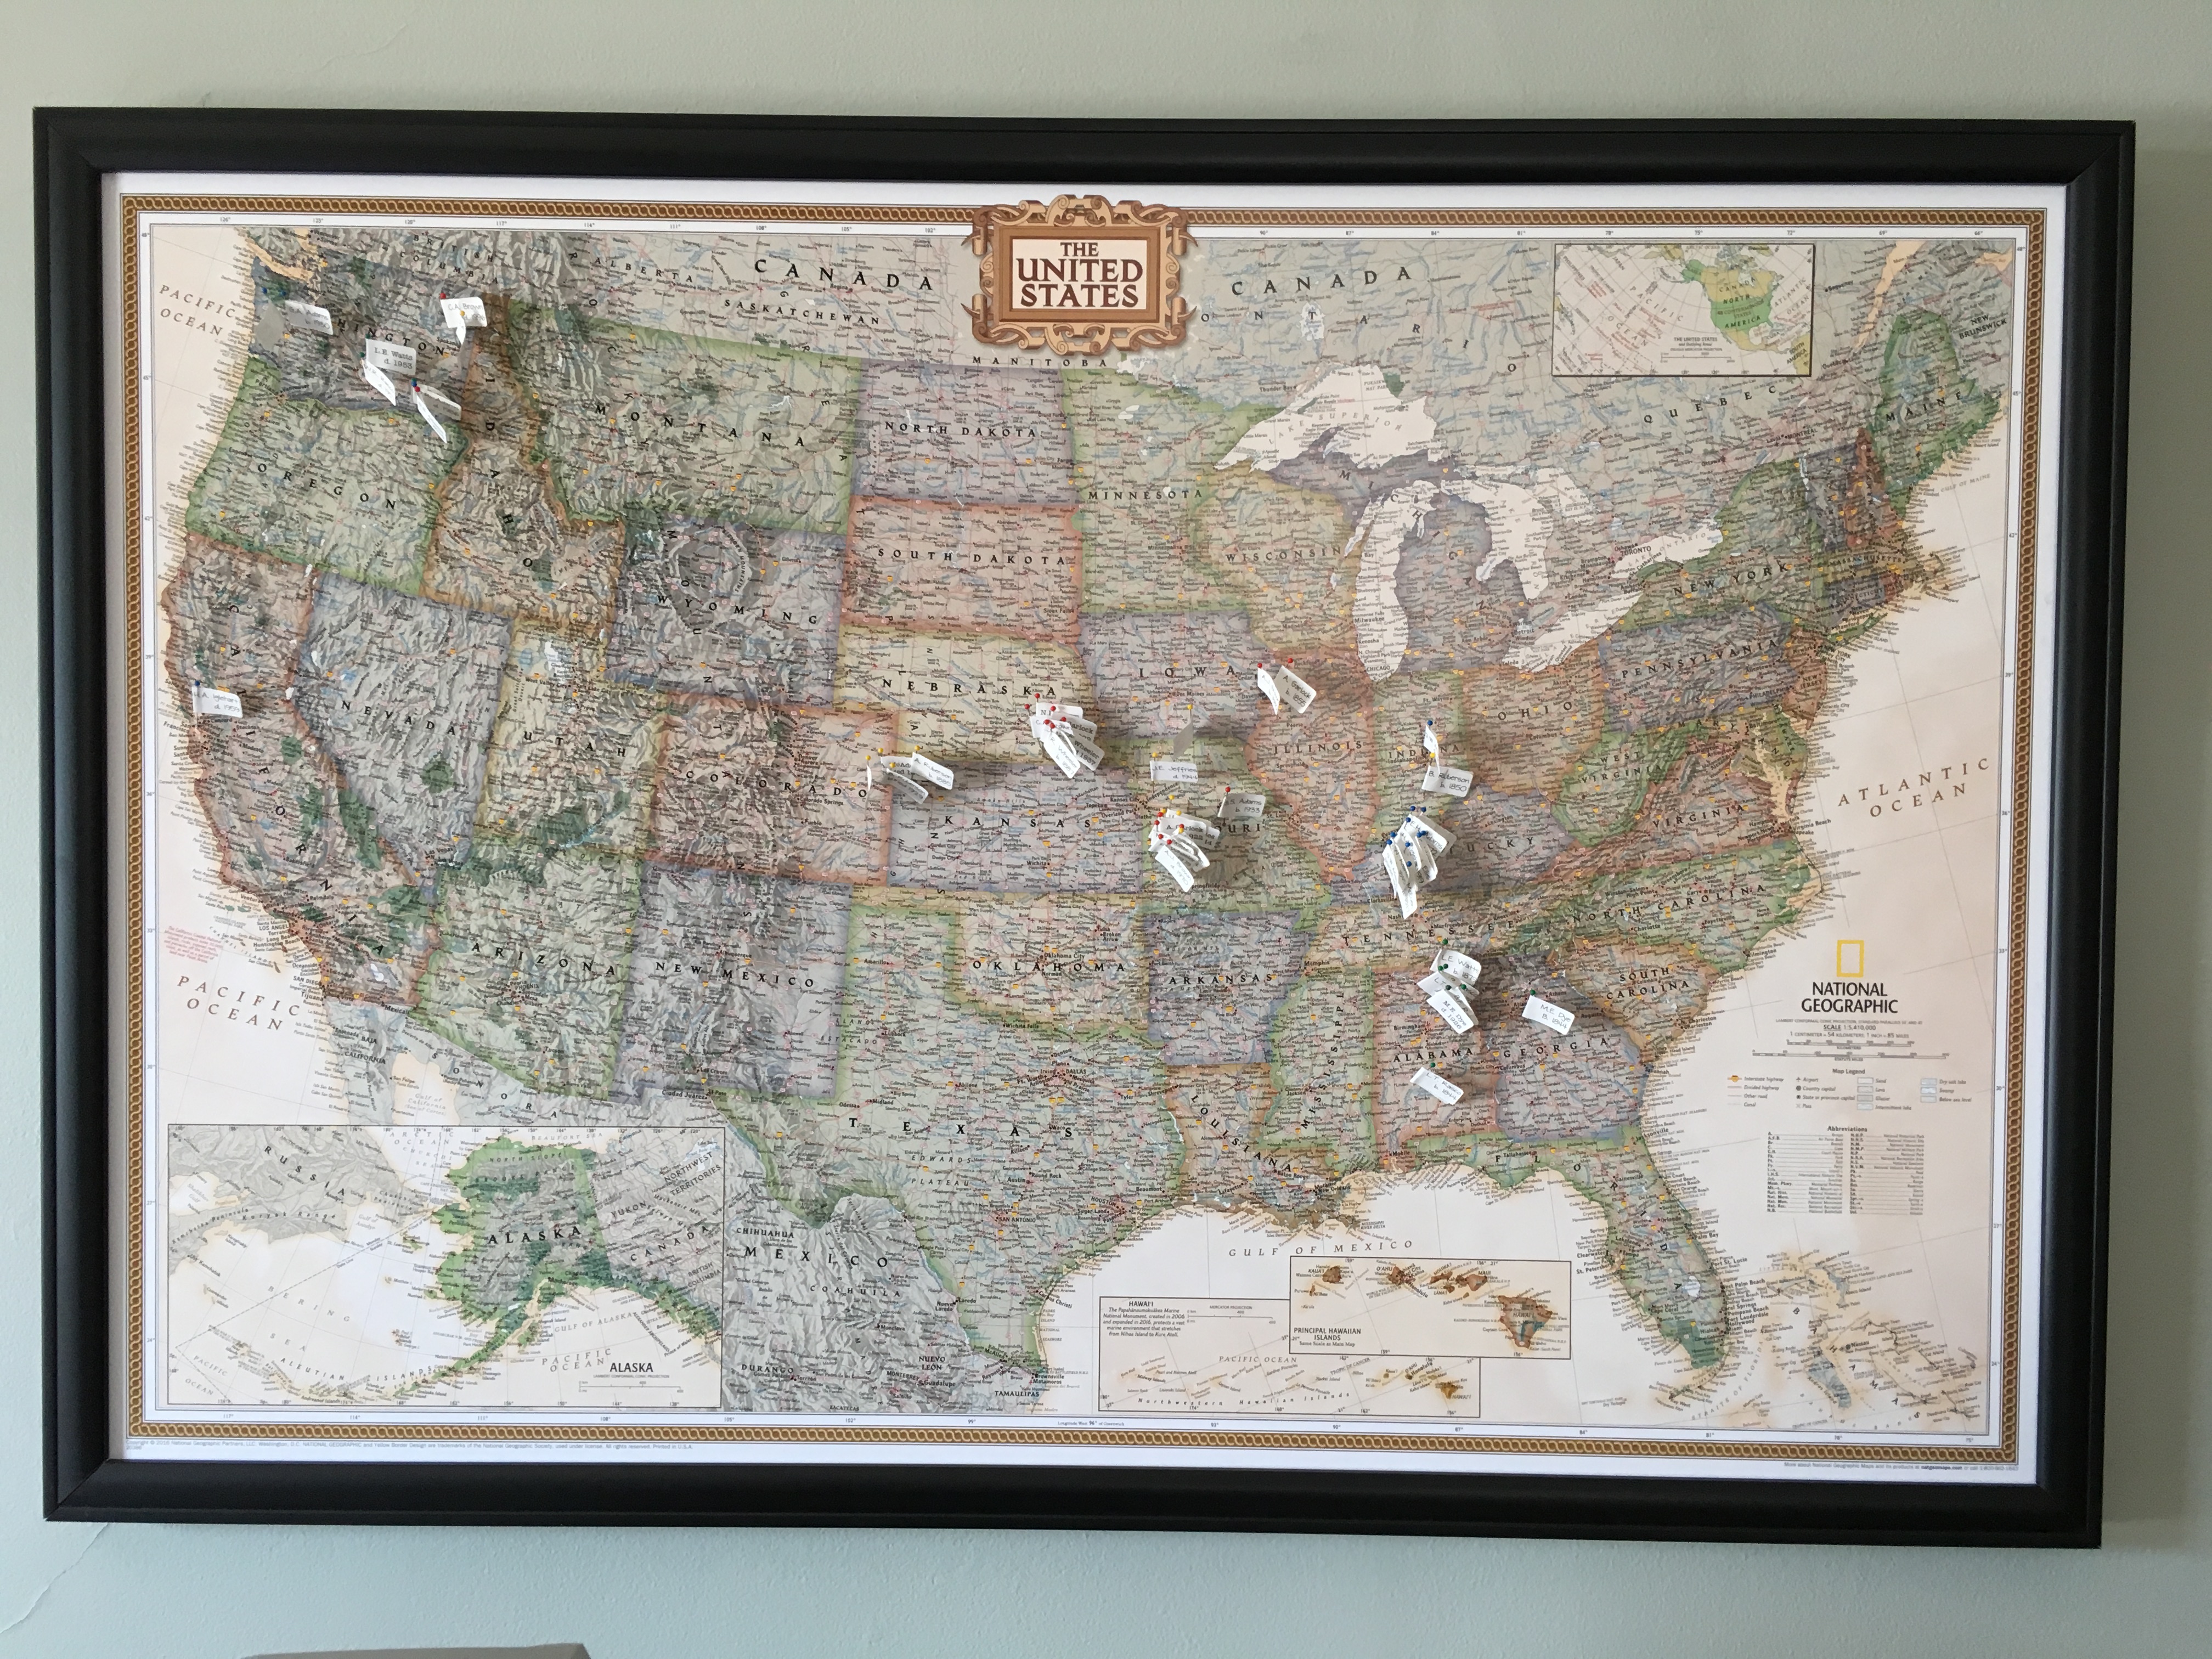
Four years ago (time flies!) I posted about how I created an ancestor map so that I could place pins on the map where my ancestors were born and died. I was proud of my DIY efforts. But I’m sorry to report that it turns out my DIY skills are lacking. Over time, the edges of the map pulled out of the frame so that pretty much all that was keeping the map in the frame were the pins. It made me sad when I looked at it and I stopped adding pins. I didn’t take it down, though, because I kept hoping I’d figure out a way to fix it.

Fast forward several years and I noticed in an organizing client’s home the exact same map in a nice frame. The map was held firmly in place and looked great. I asked her where she got it and whether she had purchased the frame with the map already in it. She had, and she sent me an Amazon link to the map.

I decided to go ahead and replace my sad map with a new and improved version. It cost about $78 but to me it’s worth it because it makes me happy, not sad, when I look at it!

I removed all the pins from the old map and put up the new map in its place, using Command hooks. Then I set to work putting the pins back up. I counted the work toward my 30 minutes of genealogy research that day, and in my research log (yay, me!) I wrote:

“The process was really fun because it was like a quiz. I’d draw a pin with a flag on it with the name of an ancestor and since I wanted to find them in my tree, without searching, I needed to know what line they came from. I also made a game of trying to get to that with the fewest clicks within my tree. Then I tried to guess the locality. And, of course, I had to find the locality on the (not very detailed) map, using Google maps for guidance.”

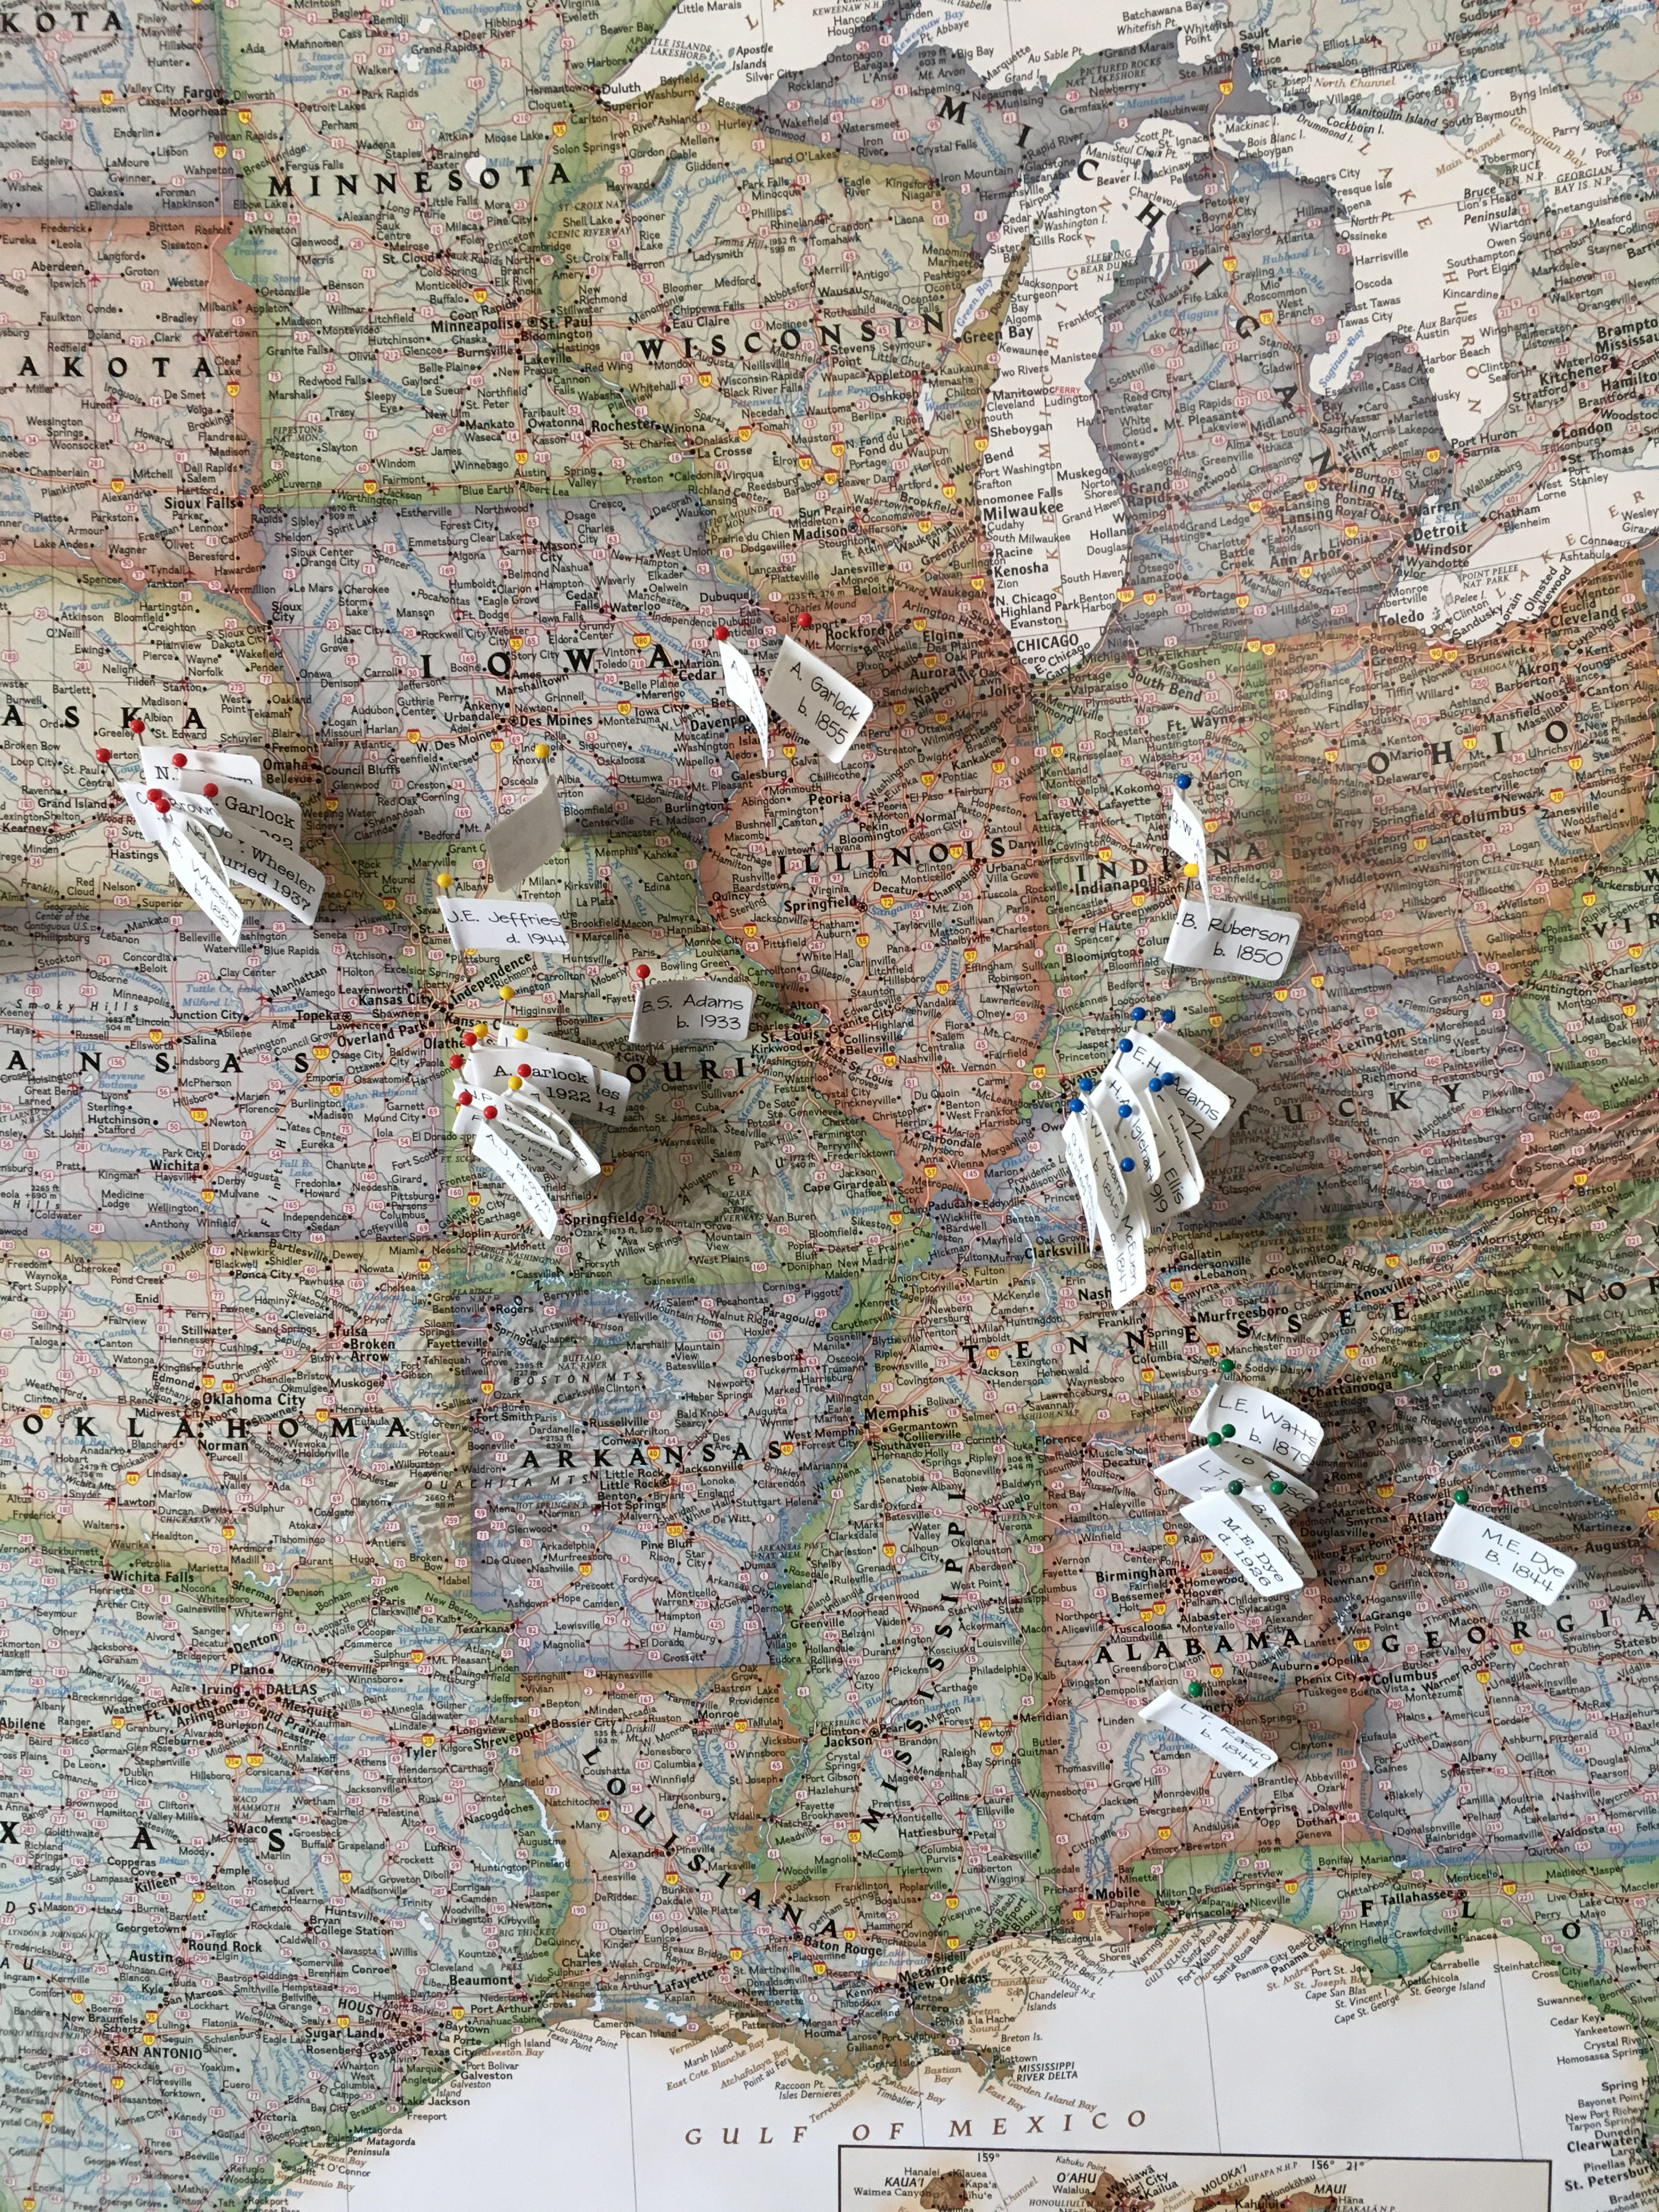
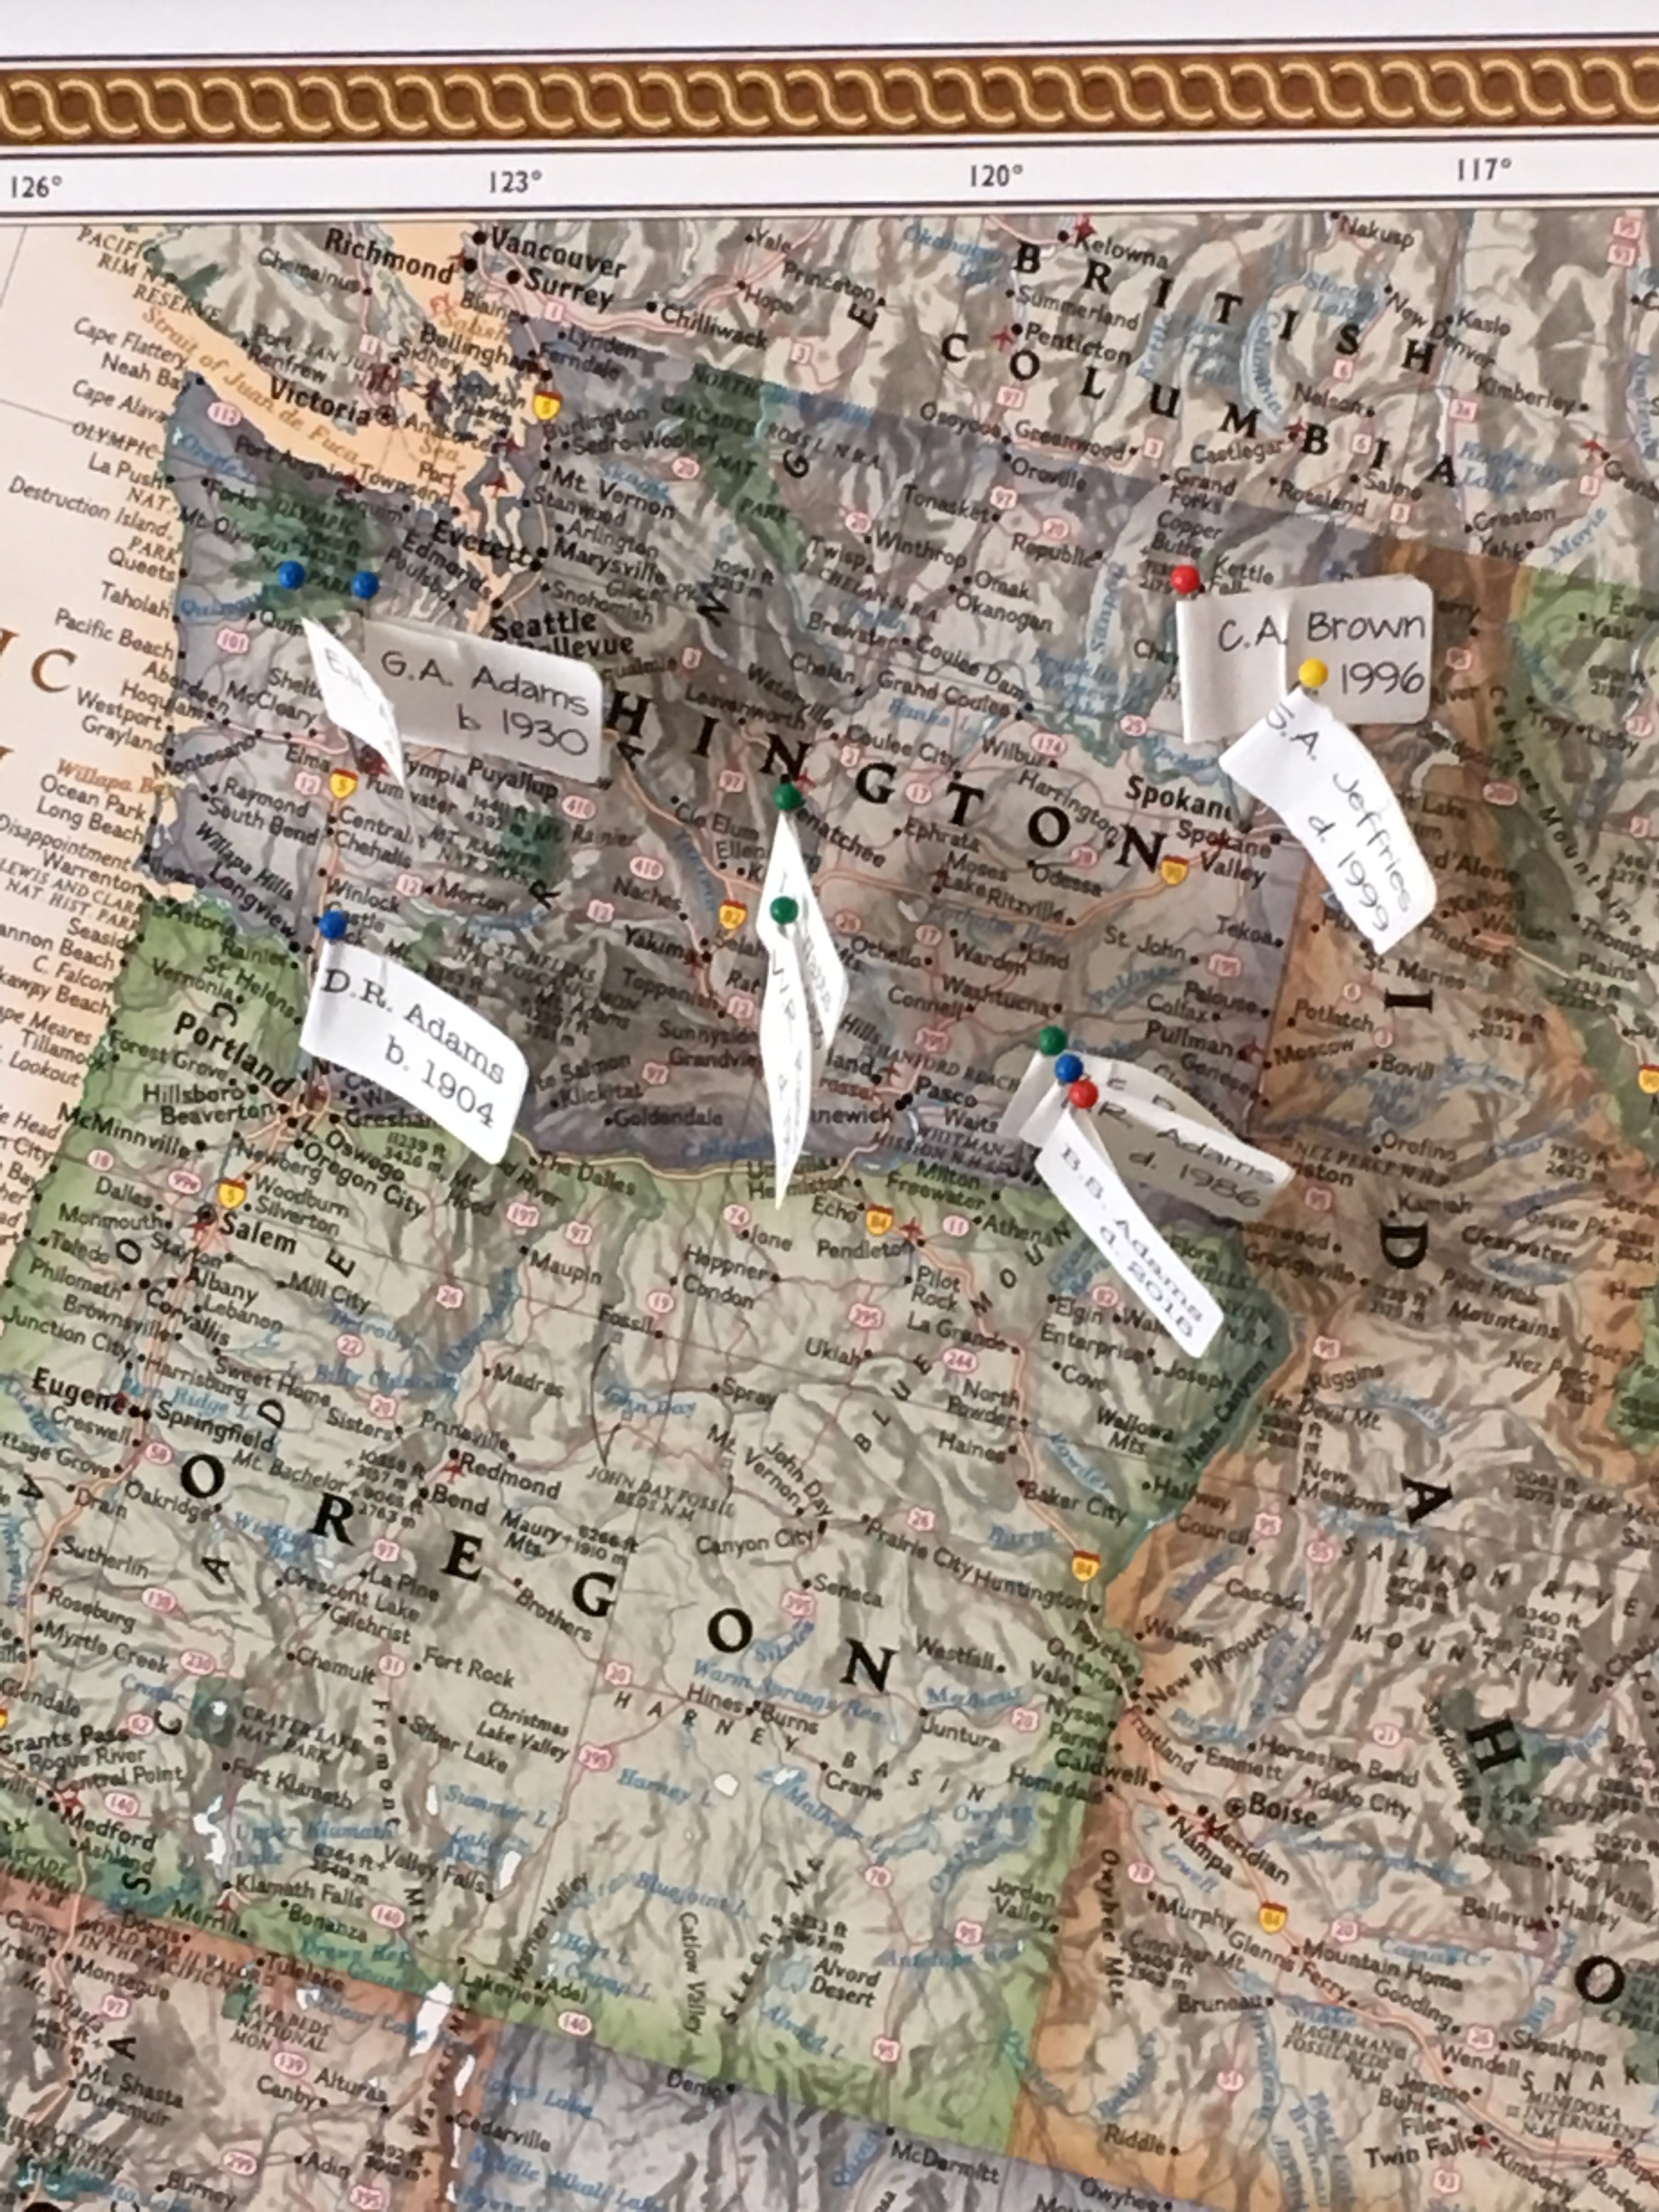
The process pointed out some holes in my data in my tree—death vs burial places for example; and birth places for which I had only a state. It also pointed to the fact that I’d filled in quite a few holes since I first put together the pin labels, even though the map pins go back no further than my great great grandparents (and not even all of those). I decided to add pins for burial places when they differed from death places, so in addition to replacing the pins that were on the map I added 11 pins.

I love seeing the clusters of pins on my map (in Alabama, Kentucky, Missouri and Washington primarily). I’ve color-coded the pins by family line and you can see that the lines converged in Pacific Northwest, where my father and his father (and I) were born and where my mother moved from Missouri at the age of three.

Here are a couple of more detailed photos of my clusters. (For those who notice such things,  I had to use a different font for the labels I added recently because I lost the old font when I upgraded my computer.)

It’s been a fun exercise and I’m looking forward to adding more pins to my map!

Filed Under: My family Tagged With: excitement, maps, organizing aids

Going through my box of inherited items: step two

October 5, 2021 By Janine Adams Leave a Comment

In August, I blogged about taking the first step to process a box of inherited items. I’m using the process I learned from Stacy Julian in her terrific RootsTech talk last year (you can read all about it in her blog post How to BEGIN with the BOX). Her process allows you get started on something that can feel very overwhelming.

I promised that when I took step two, I would post about it.

According to Stacy’s methodology, step two (after sorting the contents of the box into categories in step one) is to go through the items in a category and assess the value of each item, then note the needed actions. Here’s the secret sauce of the whole thing: You put the items that you most want to take action on–the most interesting or thrilling or beneficial finds–and put them in an Action file. And you’re allowed to have no more than 10 items in the Action file. Once you have that many items, you stop the assessment process and take action.

I want to take a moment to say how brilliant I think that is. Since you put the best stuff in the Action file and limit the number you can put there, then the Action file pretty much only contains stuff you really want to do. And there’s a built-in trigger (10 items) to get started taking action. Stacy says in her blog post that you should follow your heart and intuition in terms of deciding what goes into the Action file.

So in my efforts, I immediately gravitated to the Written Stuff file, as opposed to the Picture Stuff. That’s just my nature. I found a 50th anniversary card (pictured at the top of this post) from my mother’s brother with a snarky inscription that was so typical of my Uncle Joe. You can click on the image to see it larger, but I’ll tell you that the inscription says, “So you made it to 50 years!! Gene, I admire your tenacity. Happy anniv. Love, Joe”. I scanned the card and sent it to his kids.

Among the Written Stuff were some old newspaper clippings that were fun, though of little genealogical value, including one that shows the new jackets of the Yakima (Washington) High School basketball team circa 1949, with basketball players, including my father, Gene Adams (who is 91!), modeling them. I decided to scan the clipping and email it to my brother (who is a big fan of sports uniforms) and then put it aside to take to my father when I see him later this month.

Here’s that clipping. My dad is second from left.

I just kept going through the stuff, noting the actions and putting some of them in the Action folder. I actually ended up taking action on all the Written Stuff (I don’t think there were even 10 items) because when I started looking at the Picture Stuff I got overwhelmed.

I’m feeling great about the Written Stuff and will systematically start going through the Picture Stuff. Since the photos overwhelm me, I know that I will benefit from using Stacy’s methodology and I know that a timer will be my best friend. I’ll work on it just 10 or 15 minutes at a time. When I get finished, I’ll post again!


Filed Under: Challenges, Excitement, My family, Organizing, Preservation Tagged With: family photos, organizing aids, overwhelm, paper files, resources, Stacy Julian

Going through my box of inherited items: step one

August 24, 2021 By Janine Adams 6 Comments

On November 13, 2020 I wrote these words in a blog post about Stacy Julian’s method for going through a box of family photos, documents and memorabilia.

“When I drove to Walla Walla in September, I took the opportunity to bring home a box of family stuff. It’s not so much documents as photos, but I intend to use Stacy’s framework as I go through it.”

Nine months later, I finally opened that box this past weekend. I was excited to use Stacy’s method, which I had first heard about in her terrific 2020 RootsTech presentation. I decided to go through each of Stacy’s five steps and blog about each step after I finished it.

The first step is to sort the contents of the box into five categories:

  1. Picture Stuff
  2. Written Stuff
  3. Document Stuff
  4. Memorabilia Stuff
  5. Dimensional Stuff

I had an unused Elfa rolling  file cart and I rolled it to my workspace. I used sticky notes to label the folders. Here’s how it looked right before I started sorting:

It took me only 30 minutes to sort the entire contents of the box. As I had expected, the box contained primarily photos. I was able to tell by the handwriting on the back of many of them that at least some of the contents of the box had come from my grandmother, Susie Jeffries Brown, after she passed away in 1999. It was so touching to handle these items and remember my grandmother. (Today is my grandmother’s birthday! She was born 24 Aug 1908.) Some of the photos were framed in paper folders or wood or metal frames and I created a second Picture Stuff folder to contain those.

In addition to photos, there were some newspaper articles, as well as some other written items, including my parents’ wedding vows. (Those went into Written Stuff folder.) There were a few books, including an illustrated edition of Aesop’s Fables that had been given to my grandfather, Crawford Brown (1906-1996) in 1914. It was a Christmas gift from his grandmother, Antoinette Garlock Brown (1855-1922).

There was also a collection of the embroidery pieces I created as a kid and gave to my grandmother. She had framed them and hung them on the wall of the apartment she shared with my grandfather in their retirement home. (How sweet is that?) That’s a photo of one of them at the top of the post. The Elfa file cart has two drawers on the bottom and I ended up using both of them to hold all the dimensional stuff.

I worked hard not to spend a lot of time on individual items. The goal was to simply sort them to make them accessible. And it felt great. I can’t wait to dig in to the individual pieces.

In the next step, I will take a closer look at each document and assess value and usefulness of each item, according to Stacy’s methodology, which is detailed in her post, How to BEGIN with the BOX, on StacyJulian.com. I’ll blog about step two as soon as I finish it!

Here’s my post on step two!

Filed Under: Challenges, Excitement, My family, Organizing, Preservation Tagged With: Brown, family photos, Jeffries, organizing aids, overwhelm, paper files, resources, Stacy Julian

Handling the females in your family tree

January 27, 2021 By Janine Adams 29 Comments

Most of the women in our family trees changed their name at some point or another. That can present an organizational conundrum in the files we keep for them. I thought I’d let you know how I handle it in my digital filing system. As always, I’m not telling you the right way to do anything. I just want to share how I do it, because it’s worked well for me.

In a nutshell, I file women under their married surname. As I describe in the post How I Process a Downloaded Document, on my hard drive I have surname folders for each of the surnames in my family and within each folder I have folders for individual people. In those people folders are the individuals containing source documents. (I have a separate Collateral folder within which the surname folders for collateral relatives are filed.)

Here’s how I name women’s folders:

Last Name (Birth Name), First Name (YOB-YOD). So the folder for one of my second great grandmother’s folder is called Garlock (Ten Eyck), Anna (1832-1910). It resides in the Garlock Surname folder, as shown in the screenshot above.

If I find a relative before she’s married, I’ll use her birth surname for filing purposes. But once I’ve found marriage documents, I’ll rename and move her folder to her married surname.

It seems pretty straight forward, but of course, things like multiple marriages can make it more complicated. For my direct-line ancestors, it’s easy. I use the surname associated with the spouse who is my direct line. (If it’s a second or later marriage, I don’t typically use the first married name in the folder name, I just use the birth name.)

But for collateral relatives, where there isn’t necessarily a married name that is more relevant to me than the other married names, I typically just use the first married surname that I find and leave it like that.  Sometimes I make exceptions, especially for women who were married multiple times and for whom I have trouble keeping track of their various married names. For example, Leonora Adams, the daughter of my much-researched second great grandfather George Washington Adams, was married four times. I file her within the Adams Collateral folder using the folder name “Adams, Leonora (Lochry Stevens Good Ward), 1877-1962.”

Again, I’m not suggesting this is the best way to do it, but it works for me. I pretty much developed my system as I went along. And, as in almost all things, I allow myself to be imperfect about it. That means that  there may be inconsistencies in my folder structure. But I have enough of a solid infrastructure that the inconsistencies don’t bother me.

Writing this makes me want to go through my folders–particularly for the collateral relatives–and perhaps correct any inconsistencies. But I’m comfortable leaving them as is until I get around to doing that.

I’m curious: How do you handle the name changes of women among your files? And are there any situations I didn’t cover here that you’re curious about? Feel free to ask in the comments.


Filed Under: Challenges, My family, Organizing Tagged With: electronic files, organizing aids

  • « Go to Previous Page
  • Page 1
  • Page 2
  • Page 3
  • Page 4
  • Page 5
  • Page 6
  • Interim pages omitted …
  • Page 34
  • Go to Next Page »

about me

I'm Janine Adams, a professional organizer and a genealogy enthusiast. I love doing family history research, but I find it's very easy for me to get overwhelmed and not know where to turn next. So I'm working hard to stay organized and feel in control as I grow my family tree.

In this blog, I share my discoveries and explorations, along with my organizing challenges (and solutions). I hope by sharing what I learn along the way I'll be able to help you stay focused and have fun while you do your research, too.

tags

30 x 30 Adams amy johnson crow anniversary Brown cemetery census Civil War conferences connections dna electronic files Evernote excitement Family Curator family photos genealogy tools getting started goals How They Do It Igleheart Jeffries keepsakes learning opportunities maps newspapers NGS organizing aids overwhelm paper files planning quick tips rasco record keeping research research log research trip resources RootsTech social history source documentation Stacy Julian technology time management vital records

join the facebook community!

join the facebook community!

My organizing business

Learn more about my organizing business, Peace of Mind Organizing®.

Subscribe by RSS

  • RSS - Posts
  • RSS - Comments

© 2026 Janine Adams


Loading Comments...