My family reunion was last weekend and I had a great time. Family members were so warm and welcoming to my husband and me despite the fact that my branch of the family had not been represented at that reunion in a couple of generations. I was given family pictures (some of which I’ll probably scan and share here) and well as a painting that my grandmother had painted. It was a great weekend.
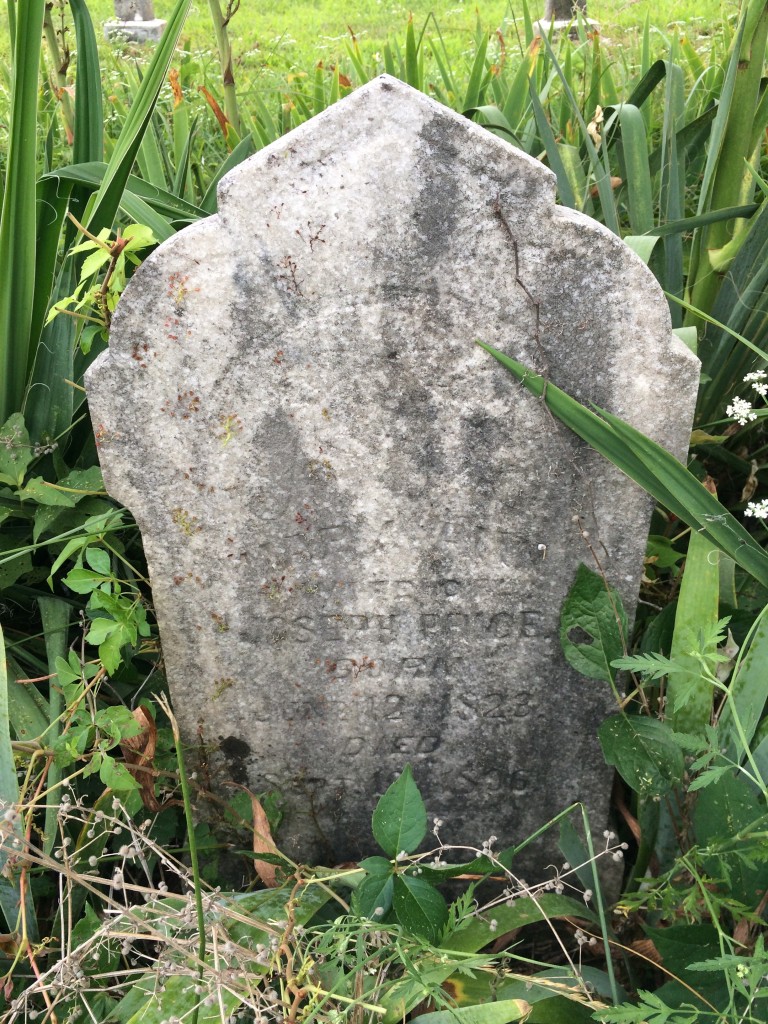
On Saturday, my husband and I paid a visit to the cemetery where my grandmother’s ancestors were buried. (This was a reunion of people from my grandfather’s side of the family, so it was an adjunct activity.) I had visited that cemetery, Meyer Cemetery, last year when I traveled to western Missouri. Three generations of Jeffries are buried in that cemetery: my great grandfather, James Earl Jeffries; his parents, John D. Jeffries and Susan Price Jeffries; his in-laws, John Price and Mary Puffenbarger Price; and his grandparents, Richard Anderson Jeffries and Harriet McKinley Jeffries. I wanted to capture some more photos of the gravestones, as well as find the graves of the Prices, which I hadn’t seen on my first visit.
Fortunately for me, I’d learned just the prior week about using aluminum foil to make reading hard-to-read gravestones much easier. I’d seen a link to a blog post called safe solutions for hard to read tombstones on the fabulous Organized Genealogist Facebook page. That post described how you can cover a gravestone with foil and rub it to make the hidden words on a gravestone almost magically appear. The post linked above suggested using a clean makeup brush. I didn’t have one so I dug around a bit more on the web and found this post on Save a Grave that suggested using a damp sponge.
So I went to the dollar store and bought some cheap aluminum foil. I grabbed a sponge from under the sink and was ready headed to the cemetery the next day. The method really felt like magic.
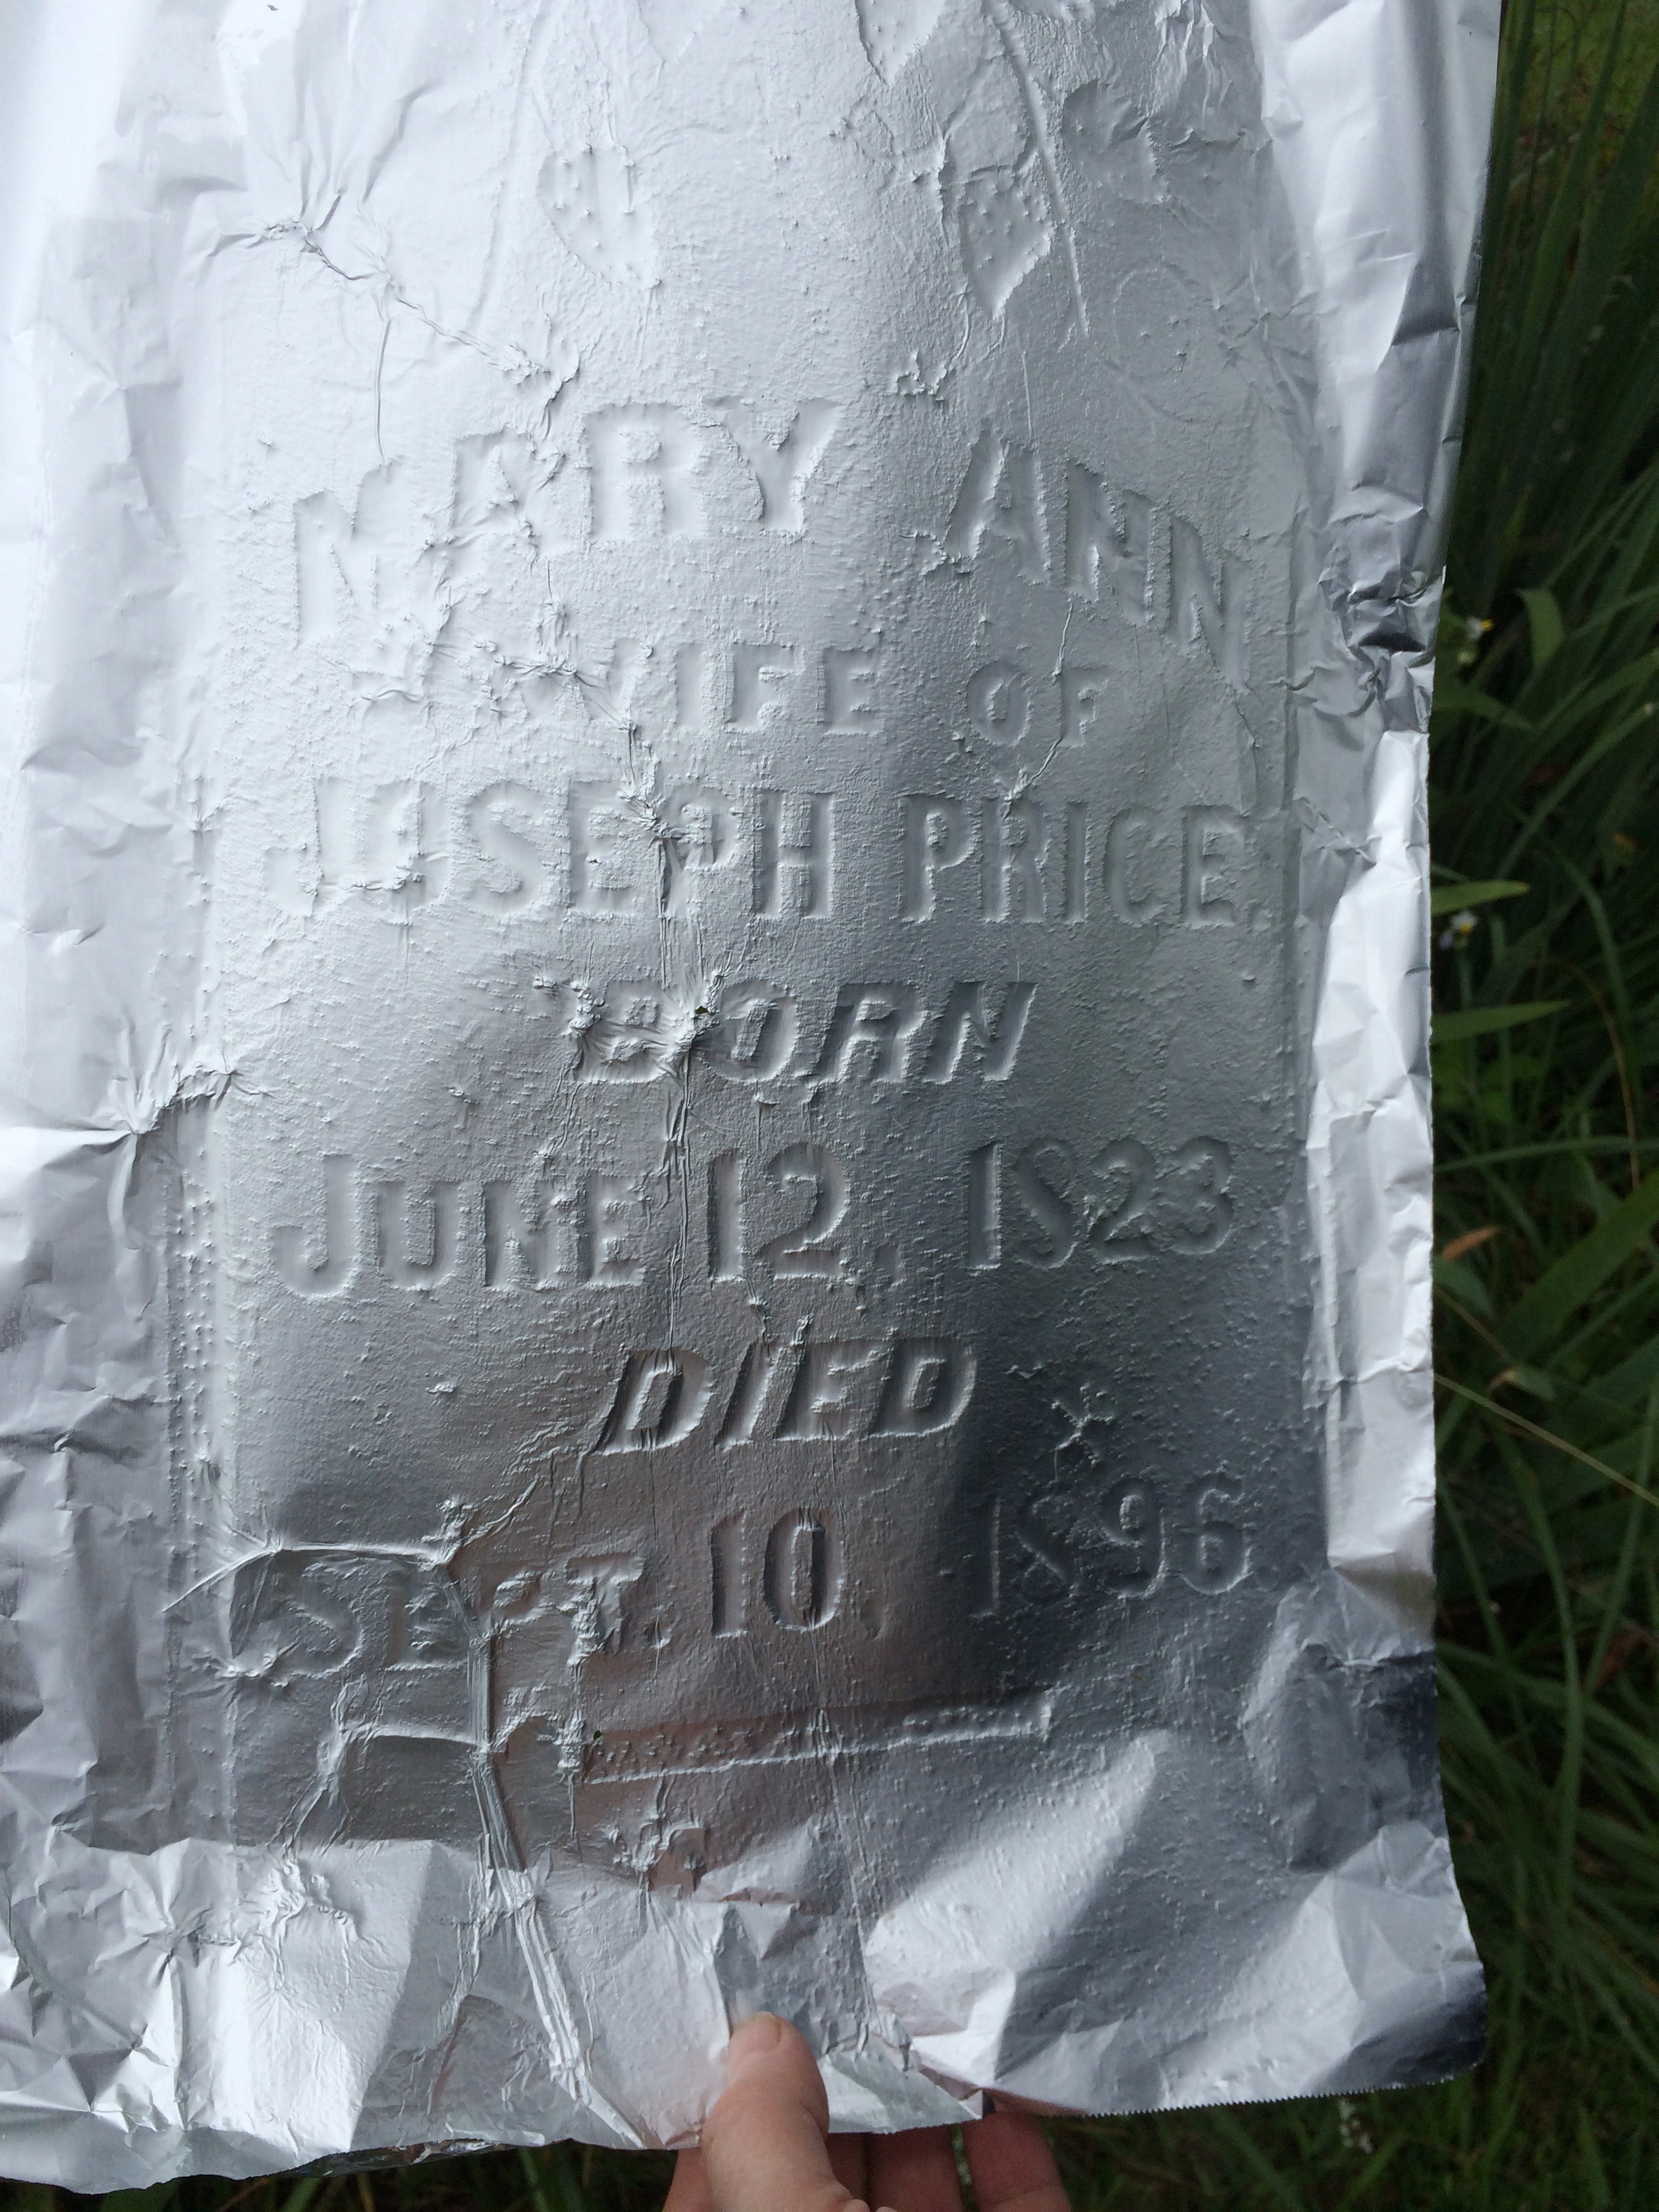
This is the stone of the Mary Ann Price, my great great great grandmother.
Cover it in foil and rub and voila, the writing emerges.
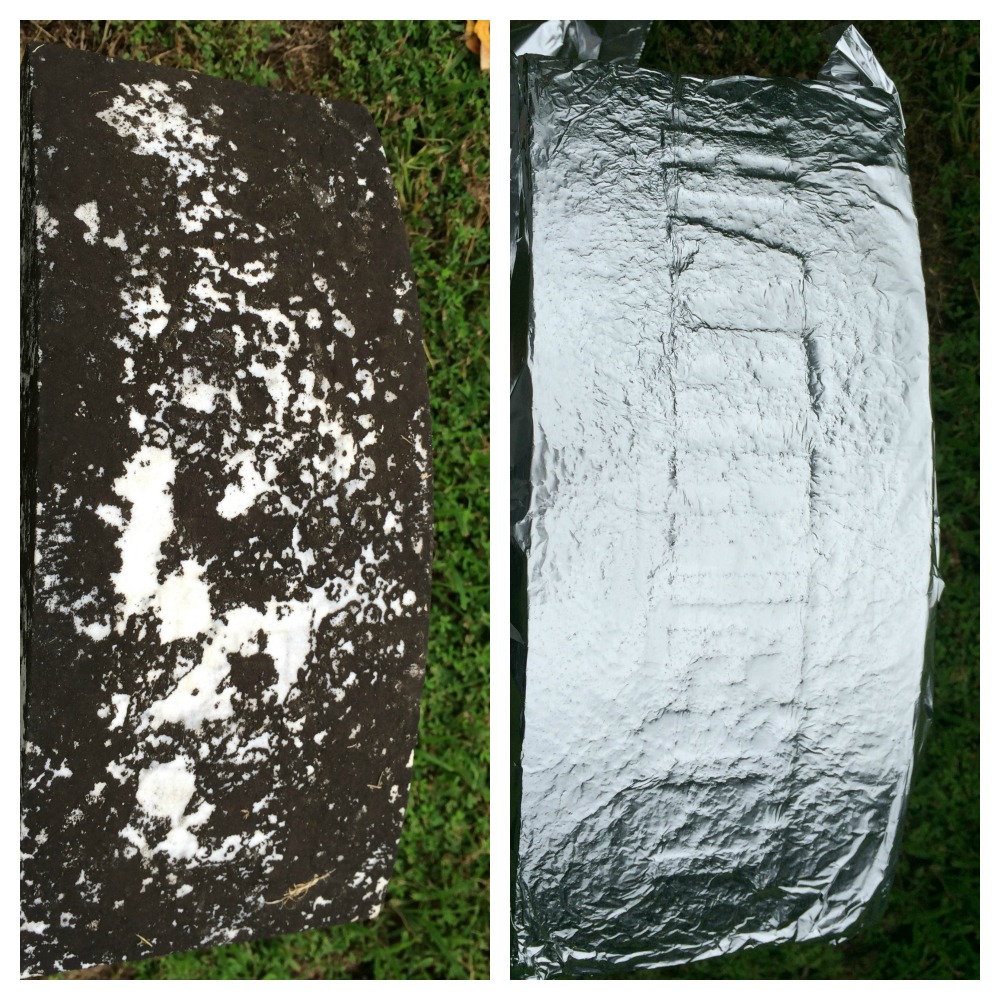
There’s a gravestone right next to my great great grandfather’s grave. The top of that same stone was so worn and dirty you couldn’t really tell that there was a name on it. But when I covered it in foil and rubbed it with a damp sponge, the name “Harriett” appeared. Amazing!
 I love this method! The downside is that, unlike gravestone rubbings–which I learned are harmful to the gravestone–it’s not easy to keep and store foil rubbings. I consider them temporary and my digital photo of the rubbed stone to be my permanent record. I can’t quite get myself to throw away the foil (it’s driving around in the back of my SUV), but soon I expect I’ll put it in the recycling bin.

This is great information. Thank you Janine!
You’re welcome, Elizabeth! I’m glad you found it helpful!
Thanks for sharing this information. I’ll try it on my great-grandmother’s unreadable tombstone. I had a wax stick that I had bought in London for tombstone rubbings, but lost it.
Hi Janine, Looks like we’re related! Rich- ard Anderson Jeffries’ dad was Rev.Elijah Jeffries, in turn brother of my 3rd Grt.Grd.father Isham Jeffries(1789- 1745).Hope this is or interest to you. New cousin,Steve Jeffries
Hey, cousin! Of course that’s of interest to me! Thanks so much for commenting! I haven’t researched my Jeffries line a whole lot but if you ever think I could be helpful to you, don’t hesitate to reach out.
When I was in grade school I remember the teacher telling us to take tissue paper and charcoal to rub over the top to make writing look stronger.
I remember that advice, too. But now it’s recommended to apply any pressure to gravestones, so the old rubbing methods aren’t considered safe.
I read the same article and it does look like magic! I’m going to Southern Illinois in August to see some family tombstones. I have already purchased my foil and can’t wait to try this.
Thanks for showing us your results.
Oooh, have fun, Vicki! I’d love to see your results!
Southern IL? My roots are there. Drop me a line! Maybe we have some connections,we can share…
Jacquie, I don’t have roots in Southern Illinois, but I’ll share your email address with commenter Vickie Sheridan and perhaps you two can connect.
I know it’s be over 3 years since you posted this comment, but I am hoping you get it. My roots are from Southern Illinois. The family has been there since the early 1800’s. Where in S.I are your people from?
Amazing results! I can’t wait to try it out.
Let me know how it works out, Laura!
Great idea! Thanks for sharing! 🙂
You are welcome, Emily! Let me know if you try it!
Janine –
Here’s a tool I just learned about. Shown to me by a friend who restores graveyards. Takes two people and a cooperating sun. One person holds a light weight mirror, about 18″ x 5 or 6′ tall, several feet away from the gravestone to be read. The person may have to stand 15+ feet away. Facing the side of the stone, (not facing the front) angle the mirror to catch the sun’s light. Reflect the light across the front of the stone. The second person reads the stone. I watched him bring unreadable gravestones from the 1750s back to life. Amazing.
Donn, thank you for sharing that! I’m fascinated and hope to be able to try it!
This is a trick I started out using in my photography and found it works great for headstones too. White foam board works wonderfully, Mines about 1/2 inch thick. I like it because you can do it with one person. You can either prop it up at the right angle, lay it on the ground at the base of the stone, (I do this for National Cemetery Veterans stones.) You can also attach a dowl to the back of it using strips of velcro. This gives you a good option for tall stones. Plus the dowl can be pushed into the ground at different angles. Another trick I’ve used to get a reading off a stone that’s beyond photographing. Take a white sheet of paper, (I’m always sure to have one, even if it’s folded up in my pocket) and put it right up against the stone. Angle it until you get the light to were you can make out what, if anything, is left. I keep a spiral bound index cards on me. I write down the info I can make out on a card, photograph the stone, photograph the index card. That way I can keep the information with the photo. Then I cross through it or flip to the next card if I have another stone.
Thank you so much for sharing those tips, EmLynn! Photographing an index card with the information right after the stone is brilliant. I appreciate your taking the time to share these great suggestions.
That’s my favorite tip in recent months, too, but I haven’t had a chance to try it yet.
It really does feel like magic, Hazel! I can’t wait to try it again in my upcoming cemetery trip.
I love this tip!!! Thanks for sharing!
You’re welcome!
I’d keep the foil forever.
You know what’s interesting, Nancy? I drove that foil around in the back of my SUV for a little while and when I took it out to show it off, the rubbing was no longer visible on the foil! So it seems to be ephemeral and I make sure I have excellent photographs while the writing is visible.
Thanks so much for commenting.
Thanks. I was wondering how & where to store the foil!
Aluminum foil is a limited resource. It is much better to use blue carboff paper for this purpose. Place a sheet against the stone and gently rub with a tennis ball. The inscription will appear and no harm to the stone.
I have never heard that suggestion, Jean. Thanks for your comment.
I’m definitely going have to try this! I had heard of another way but hadn’t tried that yet. Rub Cornstarch on headstone and use a squeegee from top to bottom to fill in the engravings and get rid of the excess. Take your pictures, then squirt water on the headstone to clean it off. It’s not supposed to be harmful to the stones or the environment. Now after reading your way, the cornstarch seems too time consuming & messy. So glad I read this before my next gravesight visit in the Spring! Thanks so much!
Laura, you’re welcome! This definitely seems easier than the cornstarch method you described. And it doesn’t seem to harm the stones at all. Please do read the articles I linked to in my post for more detailed info on the technique.
We took a water bottle and made some “mud” to rub on the gravestone…..It worked! All the writing showed up and I got a great photo!
Cornstarch can be harmful (it is “food” to bugs and smaller organisms.) Soap, shaving cream and chalk are also harmful. The foil method is less likely to damage the stone.
I saw it done with flour also but I’m reluctant to use it because so many cemetaries and people who observe this would be horrified and think that you are defacing the the headstone. This foil trick is something I’m going to have to try.
I think that foil is safer than flour. Be gentle! I hope it works for you.
Several years ago, we were on a trip across Pennsylvania with my cousin and her husband. We found many of the headstones difficult to read but my cousin’s husband had chalk with him. He rubbed it across the stones and they were much easier to read. Our photos came out quite clear. I was skeptical about the chalk as I had read that it was not good for the stone but there was no stopping him. When my husband and I went back to a couple of the cemeteries a year later the chalk had washed away and the stones were as the had been before using chalk. Is there any significant damage from the chalk?
I will carry foil and also cornstarch and water next time.
MaryAnn, I have read that chalk is damaging but don’t know definitively. But it’s not a risk I’m willing to take when foil is so easy! Thanks so much for your comment.
Chalk, flour, corn starch and shaving cream are ALL harmful as they encourage further growth of lichen and fungus which break down the porus stone. Please do not use any substance on stones. Thanks
Rhonda, thank you for explaining how chalk and other substances damage gravestones. That makes perfect sense. I’m sticking to foil!
That’s GREAT information! I went on a cemetery hopping expedition in 1999, visited four cemeteries in Center County PA. and took photos of many family gravestones. Now I can go back and get the inscriptions on some of those hard to read stones. I found over 40 relatives…when I originally went to look up only 5 of them!
Paul, what a wonderful cemetery trip that was! I’m glad you found this post helpful and am excited that you might be able to get more information from the stones! Thanks for your comment.
The cheapest foil works best…dollar store flimsy foil
Good point, Gene! That’s what I bought–foil from the dollar store. It worked great! Thanks for commenting.
I love this ! I going 2 try it .. Thanks !
You’re welcome, Marie. Good luck!
Wonderful information!! When you apply the thin foil over the stone, do you use something specific to do the rubbing? Or is just your hand enough?
Thanks for the info!
Mert, I used a damp sponge to rub over the foil. I’ve also read you can use a clean makeup brush. But the damp sponge worked well for me. Thanks for commenting!
Thank you Janine for that info about the foil, I am going to try it soon when I go to the cemetery again.
You’re welcome, Joyce! I hope you have much success with it.
Wow, Janine, that is exciting & looks so easy. I went to the cemetery a few weeks ago & couldn’t find headstones for a lot of my grandfather’s family but I still took a photo where the grave should be. When I got home and looked at the photos I realized that I think there is a headstone for my grandfather’s uncle (I zoomed in on the picture) but when I was there I didn’t really pay attention to it because it seemed unreadable. Now, on my next visit, I’ll have to try your method. (The stone looks like a type of military stone & I just found out he was in the Spanish American War, so it looks promising). Thanks for the idea.
That’s exciting, Marilyn! I hope the foil reveals that it’s your grandfather’s uncle! It is indeed easy, though I found it easier to do with my husband’s help than when I tried it alone at another cemetery. But I was able to do it by myself. Thanks for commenting.
A while ago, I tried to take a rubbing from a long gone relative. I took photographs at different angles.. when i got home, I inverted a few of the digital images (they’ll look like negatives) and you could easily read the inscriptions. It may not work all the time but nowadays, everyone has a digital camera. I wouldn’t be surprised if a few of your photoshops on your phones have them.
Thanks for that great suggestion, Shawn! I’ll have to see what I can do with some pictures I have.
Depending on the importance, you could even frame the foil for preservation. Hang it in a hallway, etc..
By the way, does anyone know how to clean lichen, etc., off my Gr.Grandmother’s stone from 1883?
I love the idea of framing the foil. What i found, though, was that after I took foil out of the back of my SUV (a few days after rubbing the gravestone with it) the letters were gone. I wonder whether putting it under glass (as in a picture frame) would preserve it.
I’m afraid I don’t know the proper way to clean lichen off a gravestone. Perhaps this article from the International Southern Cemetery Gravestones Association will be helpful: http://www.iscga.org/how-to-clean-a-gravestone.html.
There is a recommended commercially sold solution, used In Veterans’ cemeteries and for other government uses. It is supposed to be effective against lichen. It is called D/2 Biological Solution.
Your suggestion gives the best results.
Great Help, now I can revisit all the Gravestones I could not read.
So glad you found it helpful!
I used this method many, many years ago while living in New England. I found that the heavier aluminum foil worked best because I used an old, soft bristle tooth brush which helped to make a deeper, more detailed rub. We even used the rubbing as a mold for plaster castings by backing it with a piece of plywood and pouring in plaster. But beware, some cemeteries do not allow any type of rubbings at all…..rice paper and crayon, aluminum rubbings….nothing. It is always to check with the owner or the caretaker of the cemetery just to make sure.
Robert, thanks for your comment. It’s interesting that you found heavier foil helpful. The instructions I followed called for cheap foil and it worked well, though I used a sponge, not a brush. I think it’s amazing you made a plaster casting of the foil rubbing! Thank you for the advice to call ahead and make sure the cemetery is okay with the foil rubbing.
Just a thought but once you have your foil and have photographs, why not use plaster of paris of some other medium to make a cast of it from the foil, you will then have a more permanent reminder with which you could do other things with such as frame
I love that two commenters in a row mentioned a plaster casting of the foil. I had never thought of that. Probably I personally wouldn’t go to the effort since the photo works well for me and I don’t have a natural spot to store a casting. But I appreciate the suggestion!
Thank you so much for sharing this. I just called my daughter 8:05am & left message on her answer machine, because I was sure I would forget to tell her later. I am putting foil and sponge in car today (being prepared). Thanks again.
Good luck, June! I hope you have a great research time at the cemetery.
Thank you for presenting this idea and thanks to others who have other suggestions. I have just save it all to my computer for future trips to the ancestral cemeteries.
Glad you found the post and comments useful, Shaaron! Good luck on your future cemetery trips.
I’ve always carried two different coloured bars of soap and rubbed them into the unreadable stones. The next rainfull will wash it off. No damage done.
Thanks for our comment, Betty. If you haven’t already, you might want to do a little research to make sure that the type of soap you’re using won’t be damaging to the stones. The International Southern Cemetery Gravestones Association article that I referenced in a comment above (http://www.iscga.org/how-to-clean-a-gravestone.html) mentions that some soaps can be corrosive.
I have photographed over 100 cemeteries here in Ontario, Canada. Check out http://www.gravemarkers.ca
Sidewalk chalk, preferably white, but a pale yellow or green also work and usually makes an inscription very legible with no damage to the stone because one or two rainfalls and the chalk is gone.
I use different methods depending on the kind of stone and inscription. If I could include some samples here I would, but I tried to copy and paste and it didn’t work. If you try the above website you will find most of the ones I’ve photographed. Click on Ontario-Eastern Ontario-Renfrew. This will take you to the different cemeteries in the different townships. I did about 80% of those cemeteries listed.
Diane, I think it’s wonderful that you have dedicated yourself to photographing gravestones to help others! I have read that chalk is in fact damaging to the stone. (Save a Grave: http://saveagrave.net/hard-to-read-stones and New Hanover County North Carolina Genweb: http://www.ncgenweb.us/newhanover/cem1.html are two examples.) I am not an expert, but wanted to mention that for the benefit of those reading the comments.
Janine, I understand your concern, so also for the readers benefit…….I read the item you sent and as Murray is in the 16th year with his website there has never been a problem with our use of chalk, nor ever any damage to the stones reported because of it. Otherwise, he wouldn’t recommend using it for hard to read stones. Incidently, his website is very close to the one million headstones/markers photographed here in Canada.
Diane, I appreciate your following up with those assurances!!
Before we ever knew that chalk might b harmful to a tombstone (50 years ago) we used white chalk and always carried a gallon or more of water to wash the chalk off after photographs were taken. When necessary, we used a soft toothbrush to get all the chalk out of the crevices.
I did some mirror photos where possible but sometimes this was the only way.
I’m glad to hear of the foil method because I have a horror of damaging the stones. Thanks so much!
Thank you, brilliant idea. Jeffries is also in my tree, the family were living in Manchester. Lancs. UK. really think they originated from Ireland.
Kind regards,
Charmane
Thanks for your comment, Charmane! I have not gone back that far with my Jeffries line, but perhaps we’re related!
Since you can take a digital image of the rubbed foil, why not then smooth out the foil (maybe on the hood of your car) and reuse it?
I’ve tried that and it doesn’t work very well. It’s almost like getting a double exposure on film because you’ll never be able to get the foil as smooth as it is when brand new.
Thanks for both your comments!
I live in Massachusetts and am often struggling with the ability to read an old stone. I sometimes spray water on a stone which can help the letters stand out, but not always. I have also played with photo software to enhance the lettering, which can be helpful. I can’t wait to try this aluminum foil technique!
Coleen, I hope this works really well for you! It felt like nothing short of a miracle to me.
I’ve tried this but I can’t get the foil to stay in place and I end up frustrated. When I move my hand to another area of the marker to continue rubbing, the part that I just finished rubbing lifts from the surface and the inscription starts to disappear. Are you supposed to wrap the entire headstone like a mummy? What method do y’all use to keep the foil in place, then stand back and take a photo?
Debra, I wrap the portion of the headstone I’m capturing all the way around with the foil and tape the foil to itself using painter’s tape. That has worked well for me!
Ohhhhh… now I get it. Thank you Janine. I’ll give that a shot.
I tried this with dollar store brand foil and a damp sponge. I was able to get a few letters or numbers here and there but not enough to read a whole stone. Don’t know what I did wrong.
Pearl, I’m sorry to hear you had difficulty. I don’t know what to tell you, but I imagine that it depends how deeply the letters are etched on the stone. For me, the letters appeared seemingly miraculously. Perhaps it will work for you on a different stone.
Awesome idea!! Cant wait to try this on my next cemetery search.
Thanks so much, Nancy. Good luck with it!
I have just returned from a trip to Ireland and Britain and visited many cemeteries looking for family graves. Some were impossible to read so I wish I had known about this while I was over there.
Shoot, Carolyn! At least you’ll have the information for your next cemetery trip. Thanks for commenting.
Just stumbled on to your site. Awesome idea. Heading to a family reunion in Oct. Another thing that caught my eye “Price” in Missouri. Me too!
Thanks for your comment and have a wonderful family reunion! I’ll shoot you an email and we can see if we’re related.
I am going to give this a try! Can’t wait. I volunteer for Find A Grave and sometimes you can’t read the stones. You THINK it’s the right one but sometimes you can’t tell. This will be a helpful and it won’t hurt the stone. Thanks! Can’t wait to try it.
Gail, I hope it works as well for you as it did for me! Thank you for volunteering for Find a Grave. That is such a service!!
You can also use shaving cream and squeegy to remove excess. Take a picture before it drys.
Thanks for commenting, Brenda. I’ve avoided that technique because I read in the “safe solutions for hard to read gravestones” blog post I linked to in my post that shaving cream isn’t safe. The post says, “Shaving cream is dangerous because of the chemicals it is made up of which will deteroriate the stones, much like acid rain.” From everything I’ve read, the aluminum foil method is safer.
We are related. Have you received information about the William Price 200th birthday reunion?
Hello, Mat. I have not received that information! Please feel free to email me at janine@organizeyourfamilyhistory.com with more info. Thank you!
Matt, I would love information on the William Price 200th birthday reunion. I believe William Price 1816-1901 was the brother of my line Anna Priscilla Price 1813-1882.
greggnbev@sbcglobal.net
Thanks heaps for the tips on how to make unreadable headstones readable. I would like to know how you save & deal with unmarked graves ?
Carol, I’m afraid I don’t have any wisdom on dealing with unmarked graves. I blogged a few years ago about a cemetery trip I took and the grave was unmarked. Such a disappointment. Maybe someone else here has some ideas to share. Here’s that post: https://organizeyourfamilyhistory.com/nothing_ventured/
My gosh! I love this post!!! I’m hanging onto it for reference.
Thanks, Peggy!
I shared this with the Find A Grave Photographers on Facebook, and several had very favorable things to say about the technique, and added a few tricks of their own. One could probably include the molding in a photo on the memorials, as I have seen others post rubbings of markers. Am definitely going to try this on our older markers in the nearby cemetery.
Cathy, thanks for sharing! I think you could absolutely include the photo of the foil on the memorials…the ones I’ve taken have photographed well. I hope you find the technique useful and fun; it feels like magic to me!
Be sure and post at least two photos if you do this, Cathy. One of the stone in its natural condition, and another with the foil so that the inscription can be read. For relatives who live far away, this may be their only chance to “see” the headstone.
I’ll bet with a soft cloth you could smooth out the foil and use it again to do “foil rubbings”. Would have to be careful so as to not tear the foil. I do it all the time to re-use for covering stuff for oven/fridge.
Thanks for the suggestion, Rebecca. It seems unlikely to me that the foil would be smooth enough to get a good rubbing on a second use. But it’s worthh a try!
What a great idea! I’m trying it tomorrow on a stone I have been trying to figure out for years. Another hint is to time your trips to the cemeteries according to the position of the sun in the sky. I have stood directly in front of a beautiful white headstone from 1874 and could not read it at all due to the fact that the sun was shining directly on it, about 3 or 4 o’clock in the afternoon. I even tried feeling the letters with my fingers, to no avail. I went back the next day, just an hour or so past mid day and the sun cast a shadow downward on all of the letters and I could read the stone perfectly! When there’s lettering on both sides, I’ve made late morning and early afternoon trips to get both sides. This also eliminates your shadow being cast on the stone and ruining your photo. It’s such a pleasure reading everyone’s hints on how to get good readings of the headstones they research.
What an interesting point, Tammy! Thanks for sharing. I’m so glad you’re enjoying the discussion.
Hi Janine. I found your site 2wks ago, as someone posted this foil blog to our local history facebook page here in Western Australia. Last wk I visited the main cemetery in our capital Perth and tried the foil trick on a tombstone I previously couldn’t even read properly using my fingers across the indents…and WOW, just like magic, there was the whole inscription. Thanks so much. No more frustrating and seemingly wasted trips anymore.
I’m so glad the blog post was helpful! The foil trick really does feel like magic!
Just a hint of advice. If you do use this method, don’t push on the stone. Use small pieces of gift tape to hold foil in place that way you are not leaning one the stone with your hand. Thanks
It’s weird but I’m just going to let you know that aluminum foil isn’t recycled. It is usually because the sorters at the recycling facilities automatically assume it is contaminated with food and it’s not pure aluminum. Nice article though. I might have to try this with some grave stones we found on the side of a road (I am assuming it is a slave burial site) that you can barely read anything… very gently though!!!
Thanks for pointing out that aluminum foil sometimes isn’t recycled, Joanna. I had no idea.
You can also take tracing paper and lay it on stone and rub chalk over it to get readings.
Thanks for commenting. I think the aluminum foil method is viewed as more gentle than a rubbing since it requires less pressure on the stone.
Great info. Here’s another tip: you can use a super bright LED flashlight. Mine is 900 lumens and cost $19 on Amazon. Shine the light across the front of a hard to read headstone and the lettering will come alive. If look at the images at https://www.findagrave.com/memorial/9108582/elizabeth-taylor, you will see one without lighting and the other with.
Thank you for that tip, Michael!!
Hi, I’m from Belize, Central America and our cemeteries have been thru major Hurricanes, Rains and flooding’s. Most graves were damaged from sunken in water and cannot see all inscription. Are there other methods or suggestion besides i.e. Foil and 2 lights? Anyone knows if there’s an app that can correct or give you sight to view words on the grave? Thanks for all the suggestions, and as well I cannot wait to try the two most suggested. This is an awesome information.
Jojo, I don’t have more suggestions, but perhaps someone reading these comments will! So glad you’ve found this post helpful.
Exactly what I needed. Thank you!
So glad you find it helpful, Matthew!
We’ve heard about using foil but forgot about it on our last trip to one of the families oldest cemeteries. The three gravestones there (merely flat rocks) are very difficult to read because the text was hand carved. We’ll be more prepared next go round with foil. let’s hope this trick works when we return to the site. Thanks Janine
You’re welcome! I’m glad you found the post helpful!
Maybe I didn’t see this said, but I always make sure I go to the cemetery anytime between 12::00 and 2:00 PM to make sure the sun is always directly on the older stones. It’s like magic to use the light. I will admit it’s not always easy to read the really bad ones, but I would say I’m very successful even on the bad ones using the light. I have tried using mud on white stones. Mud is natural and seems like it shouldn’t harm a stone. On stones that are blackened, I have used a spray that is sold for cleaning off stones. I tried the foil method once and it didn’t turn out well for me, but I may not have had cheap foil.