• BLOG
  • ABOUT
    • Privacy Policy
  • CONTACT

Organize Your Family History

Stay focused and happy while exploring your roots

My process for downloaded documents

May 5, 2023 By Janine Adams 4 Comments

Life’s a little nuts right now, so rather than creating a new post, I’m re-running this post from October 20, 2017 in which I describe my workflow for a document I downloaded from the internet. Almost six years later, the process hasn’t really changed! For more detailed information on how I process digital documents, check out How I Do It: A Professional Organizer’s Genealogy Workflow, a 37-page downloadable pdf available for $19.99.

Last March, I wrote a post called My digital workflow that detailed what I do with a document I find on the Internet. (I never print it.) My digital workflow has not changed since then and it’s working out really well for me.

Last weekend, I did a talk at the St. Louis Genealogy Conference about going paperless and in my Powerpoint I included screenshots of the digital workflow and also a summary slide. The attendees asked for copies of the summary slide, so I decided to post it here.

The process is basically the same as my March post but I switched up the steps a little.

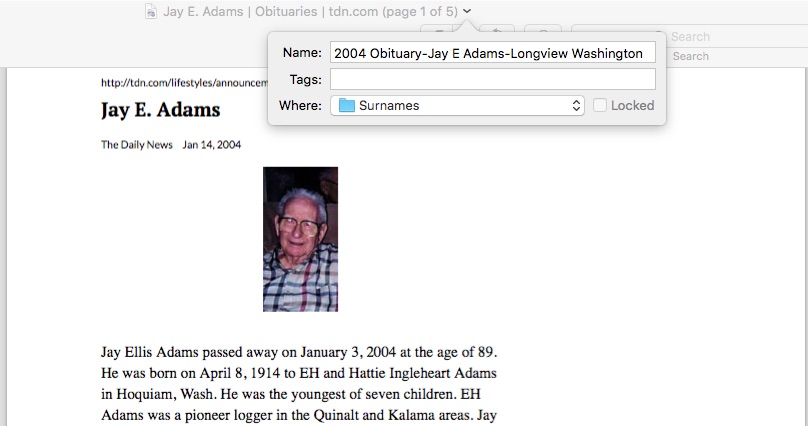
The example I used in my talk was my father’s uncle, Jay Ellis Adams (1914-2004). I had found his obituary online at the newspaper’s website. Here’s the workflow:

1. I click Print and, in the printer dialog box, Open in Preview (my Mac’s default pdf reader), which downloads the document to my computer. (If it had been a document at Ancestry, I would have clicked Save, then Save to My Computer.)

2. I immediately rename the file, using my file-naming protocol, which is Date Type of Document-Ancestor Name-Locality. I stick it into my Surnames folder, as a temporary holding place until I file it in step 6. I know that any unfiled documents in the Surnames folder require processing.


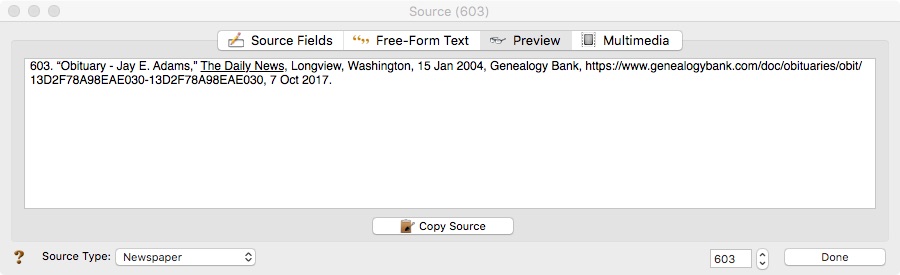
3. I select a fact from the document, add it to Reunion and create a source citation for it.


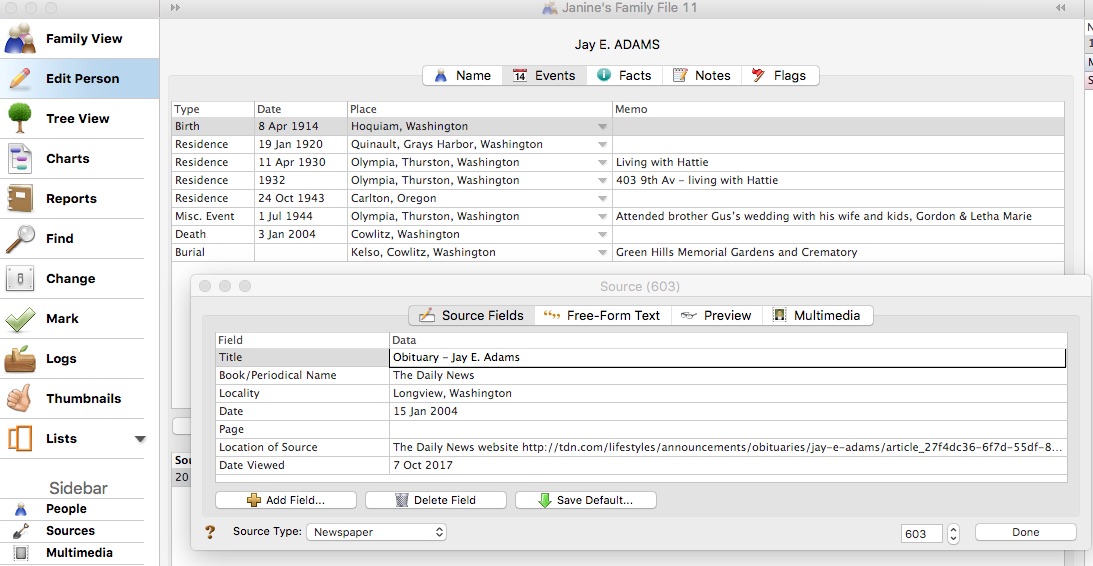
4. In Reunion, I click the Preview tab in the source record and then click Copy Source. (For the eagle-eyes among you, I originally found a transcript at Genealogy Bank and used that as the source citation. Then I decided to go to the newspaper’s website and download it from there, so I changed the source citation. But I was too lazy to take a new screenshot.)

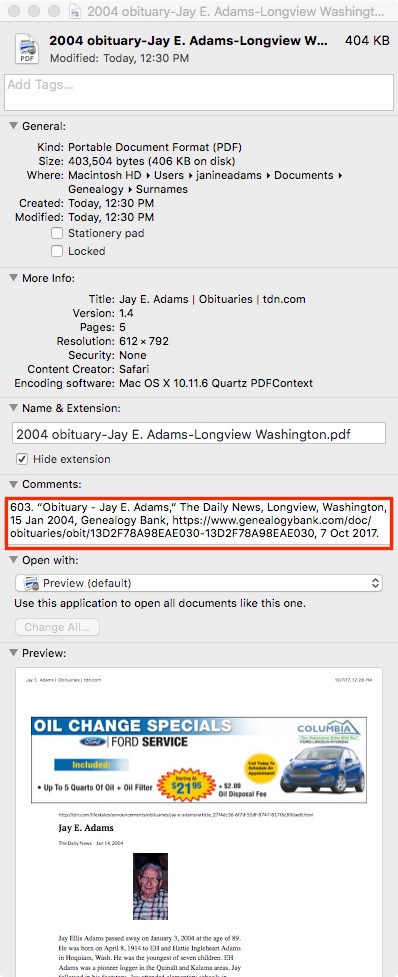
5. I paste the source citation into the metadata of the source document (the obituary) by Ctrl-clicking on the file and selecting Get Info from the menu that appears, then pasting into the Comments area.


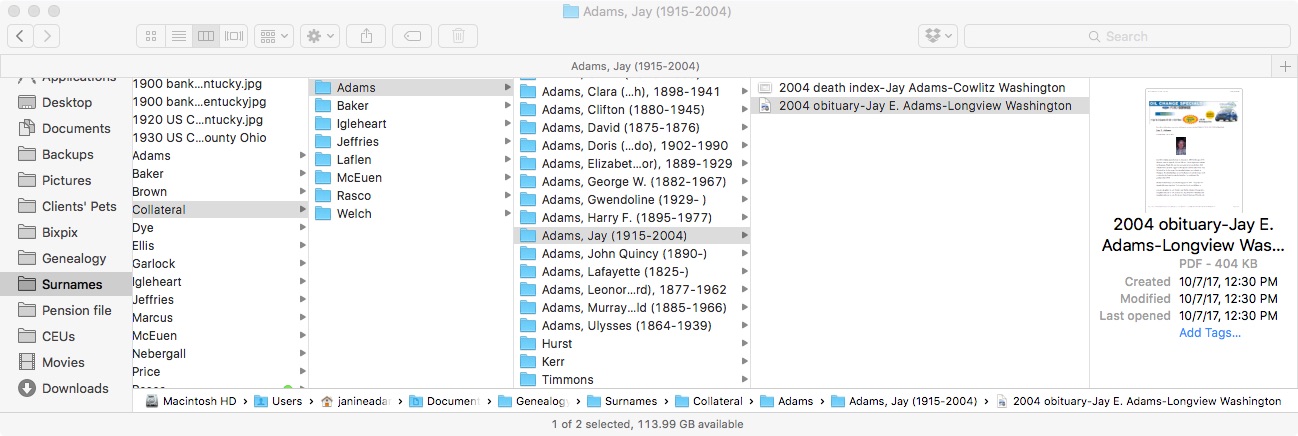
6. Then I file the document into my folder structure. My folder structure for collateral relatives is Genealogy/Surnames/Collateral/[Surname]/[Name of Ancestor (YOB-YOD)]. If the document  applies to multiple people, I duplicate it for each person and then drag it into the appropriate folder for each person. But I don’t take the trouble to rename it.

7. The final step is to drag the document into the Multimedia area of the source record in Reunion. This creates a link to the document so that I can open it up inside Reunion, which is very handy.


From there, I continue to extract information from the source document and add that it to Reunion. Every piece of information I glean from a single source document uses the same source number, no matter what person it applies to.

Here’s the summary slide:

This is the way I do and it works well for me. Of course, it’s not the only way to do it or perhaps the best way to do it. But I’m hoping you’ll find it useful to see my workflow. I’ve been processing documents this way for almost a year now and it’s working very well.

Again, for more in-depth information on how I organize my own genealogy, check out How I Do It: A Professional Organizer’s Genealogy Workflow, a 37-page downloadable pdf available for $19.99.

Filed Under: Challenges, My family, Organizing, Technology Tagged With: Adams, electronic files, organizing aids, record keeping, source documentation

Creating a virtual RootsTech playlist

February 22, 2023 By Janine Adams 6 Comments

It’s that time of year again! The RootsTech conference will be held March 2 to 4, 2023. This year, they’re offering the conference both in-person and virtually. I made the decision not to attend in person, but I did register for the virtual conference and spent a little bit of time this morning putting some sessions onto my playlist. (It’s not too late to register for either option!)

I’m easily overwhelmed by choices and I found the choices of sessions to watch over the last two virtual conferences a little overwhelming. In case you’re the same way, I thought I’d share how I went about creating a playlist for me to watch next week or beyond. (I’m assuming, though I don’t know for sure, that the main stage sessions will be recorded for future watching.)

  1. First, I registered for the conference. (I did that back in January.)
  2. Then I logged into the Rootstech website by clicking on Sign In in the top menu bar.
  3. I clicked RootsTech 2023 in the top menu bar, then Calendar (in the Virtual section). I went through both the Main Stage and Sessions listings, clicking the Add to Playlist button for those sessions I didn’t want to miss.
  4. Then I clicked On Demand in the top menu bar, then Browse the Library. I was pleased to see 2023 sessions listed, though I won’t be able to watch them until the conference starts. I added to my playlist the sessions that caught my fancy.
  5. I didn’t want to have to browse all the offerings, so I clicked on Search the Full Library. Then I put the Filters to work for me. I selected English and 2023 (that narrowed it to 228 classes) and then I used the Search function. I searched for Organizing and got a very manageable 13 results. I selected some of those to add to my playlist.

In less than ten minutes, I added 22 sessions to my playlist. And I noticed that my playlists from 2021 and 2022 are still available!

There are so many learning opportunities at RootsTech. I’m sad not to be attending in person but I am very grateful that RootsTech makes it so easy (and inexpensive–it’s free!) to participate from home.


Filed Under: Challenges, Excitement, Genealogy tips, Technology Tagged With: conferences, learning opportunities, RootsTech

Two-part program on Zotero for genealogy starts tomorrow

February 3, 2023 By Janine Adams 2 Comments

Reader Donna Cox Baker is an enthusiastic advocate for using the tool Zotero to organize genealogy research. She wrote a guest post about it for this blog and also described it in her How I Do It interview from 2018.

So I was interested when I received an email yesterday from about a two-part program that Donna is teaching for the Bucks County (Pennsylvania) Genealogy Society (BCGS) called “Zotero for Genealogy: Harnessing the Power of Your Research.” The first part is tomorrow, February 4, from 10 am to 12 pm eastern. The second part will be on March 4. Donna says, “Part I will be about the essential core of Zotero and why genealogists need it. Part II will be about various creative ways I’ve expanded on the Zotero basics to make it a real powerhouse tool–such things as timelines, map legends, ticklers, research planning, thought mapping, and more.”

I still haven’t explored Zotero, so I’m interested in watching her programs. The fee is $10 per workshop for non-members of BCGS and $5 for members. The presentations are being recorded and will be available, to members only, for 30 days. I’m not able to attend live tomorrow, so I elected to join the Bucks County Genealogical Society for only $20 and then I’ll have $5 access to the two workshops (and any future workshops in 2023.) It’s worth it to me to pay an extra $10 for access to the recordings for 30 days.

If you’re interested too, go to this page on the BCGS website to learn about the program and this page to register as a non-member. If you’d rather join first, you can read about membership benefits or skip right to the online membership application form. It’s worth noting that when I joined this morning, I did not instantly gain access to registering for the program at the members’ rate. (I’m waiting for a welcome email with a login.) So if you’re planning to go this route, you might want to join today rather than waiting for tomorrow.

Filed Under: Genealogy tips, Organizing, Technology Tagged With: Donna Cox Baker, genealogy tools, learning opportunities, organizing aids, record keeping, research log, resources, source documentation, technology, Zotero

How do I start going digital?

November 29, 2022 By Janine Adams Leave a Comment

A year ago, I posted this article under the name Getting Started Going Digital. I think it’s an important topic, so I decided to run it again today. If you find this topic engaging, I encourage you to click on the link for the original article and look at the comments–reader Marian added interesting insights on approaching an overwhelming pile of papers.

If you’ve been pondering transitioning to digital organization of your genealogy records, you may be stymied about how to get started. It can feel overwhelming and perfectionism might be paralyzing you.

If you’ve been reading this blog for awhile, you know that I’m almost completely paperless in my genealogy research. I started out printing and filing everything but transitioned over a few years to digital. I didn’t make a decision to go paperless on a certain date. Rather, once I had a trustworthy digital folder structure and file-naming protocol in place, I didn’t feel like I needed to print anything out. I’m lucky, in a way. I came to this after just a couple of years of serious research. So I didn’t have a huge backlog to contend with.

I get a good number of questions from folks who have been researching for years and have a whole of lot paper to show for it. They want to go digital but don’t know where to start digitizing their research. If that’s something you think about, here’s a post designed to help you get started.

Here’s what I recommend as the first steps to organizing your genealogy research digitally.

  1. Create a folder structure and a file-naming protocol. This is critical so you easily find your documents. I describe my folder structure and file-naming protocol in step six of this blog post.
  2. From this point forward, stop printing and start downloading documents you find online, using your new folder structure and file-naming protocol. If you start now, you’ll familiarize yourself with your the new file system and you won’t add to your backlog of documents to be scanned and filed.
  3. Start scanning, renaming and filing your paper documents. What I did was go through my paper file folders, which were organized by couple, one by one, evaluating each piece of paper and scanning documents any that I didn’t already have in electronic form. I blogged about it in a post called Marrying my electronic and paper files. This may sound tedious, but I urge you to think about this as an opportunity to check your research. Looking at each paper, you may come across evidence that you overlooked when you first filed those papers. Here’s the good news: you don’t have to take a vacation to get it done. You can do it little by little, person by person or couple by couple (depending on how your paper documents are organized).
  4. Recycle or shred paper after you scan it. I see no reason to hang onto the paper files you have scanned, unless they have some historical value. For example, after I carefully scanned it, I kept the epic handwritten letter my grandfather wrote my grandmother before they married.
  5. If you find yourself pulling a paper document out of your files to help you in your current research, go ahead and scan and file it electronically. Then toss the paper.
  6. It should go without saying, but I’ll say it anyway. If you’re organizing your genealogy research digitally it’s imperative that you have a routine in place for backing up your hard drive. (Look no further than my recent experience of my backup saving my bacon when my computer died without warning.) It’s a good idea to have more than one back up.

This process reminds me of that age-old question: “How do you eat an elephant?” One bite at a time. Once you get your folder structure and file-naming protocol set up, you just take it paper by paper. Acknowledge that it will take awhile. Recognize the value of going through your old papers. And keep your eye on the prize: An easily accessible, readable and sharable archive of your genealogy records.

For detailed information on the digital organizing system I created for my research, check out my 2021 Orderly Roots Guide, How I Do It: A Professional Organizer’s Genealogy Workflow. The downloadable pdf is 37 pages and available for $19.99.

Photo by Tom Woodward via Flickr. Used under Creative Commons License.


Filed Under: Challenges, Genealogy tips, Organizing, Technology Tagged With: electronic files, organizing aids, paper files, record keeping, technology

  • « Go to Previous Page
  • Page 1
  • Page 2
  • Page 3
  • Page 4
  • Page 5
  • Interim pages omitted …
  • Page 27
  • Go to Next Page »

about me

I'm Janine Adams, a professional organizer and a genealogy enthusiast. I love doing family history research, but I find it's very easy for me to get overwhelmed and not know where to turn next. So I'm working hard to stay organized and feel in control as I grow my family tree.

In this blog, I share my discoveries and explorations, along with my organizing challenges (and solutions). I hope by sharing what I learn along the way I'll be able to help you stay focused and have fun while you do your research, too.

tags

30 x 30 Adams amy johnson crow anniversary Brown cemetery census Civil War conferences connections dna electronic files Evernote excitement Family Curator family photos genealogy tools getting started goals How They Do It Igleheart Jeffries keepsakes learning opportunities maps newspapers NGS organizing aids overwhelm paper files planning quick tips rasco record keeping research research log research trip resources RootsTech social history source documentation Stacy Julian technology time management vital records

join the facebook community!

join the facebook community!

My organizing business

Learn more about my organizing business, Peace of Mind Organizing®.

Subscribe by RSS

  • RSS - Posts
  • RSS - Comments

© 2026 Janine Adams


Loading Comments...